Showing posts with label Storage. Show all posts

Tuesday, April 05, 2011

Tool Cabinet Update


I finished up my tool cabinet last week, but forgot to post anything about it.  I cut some 1/4" Luan plywood for the front panel, which works well enough.  The door tends to sag a bit, because I only have one dovetail at each corner.  I put a little glue in each of the joints, but it doesn't seem to be helping.  No big deal, really, the door just rubs a bit when I close it.  Outside of the glue I put in the door joints, there is no glue in the carcass of this cabinet.

I stuck the wood bits to the door using some contact cement, and realized too late that the bottom block for holding my adjustable square is too high to allow the stock clearance below the wood square.  I guess I'll just have to make a small wood square to take it's place.  I put some small screw-in hooks on the lower block that hold my sliding bevel and my marking gauge.  The block for my carcass saw was cut out of a chunk of 2x Doug Fir with my 12" bowsaw, and trimmed to fit with a chisel and knife.  I'm thinking I'll eventually move the chisel rack up about 8 inches and put a few drawers under them.  I'll also be adding a second chisel rack in front of the mortise chisels for my couple of bevel edge chisels.  The plane tray is attached with hinges, allowing me to easily access the void behind it (currently storing my plow plane).

Reaching for my plow plane:


Sunday, February 20, 2011

Storage Solution and a Plan


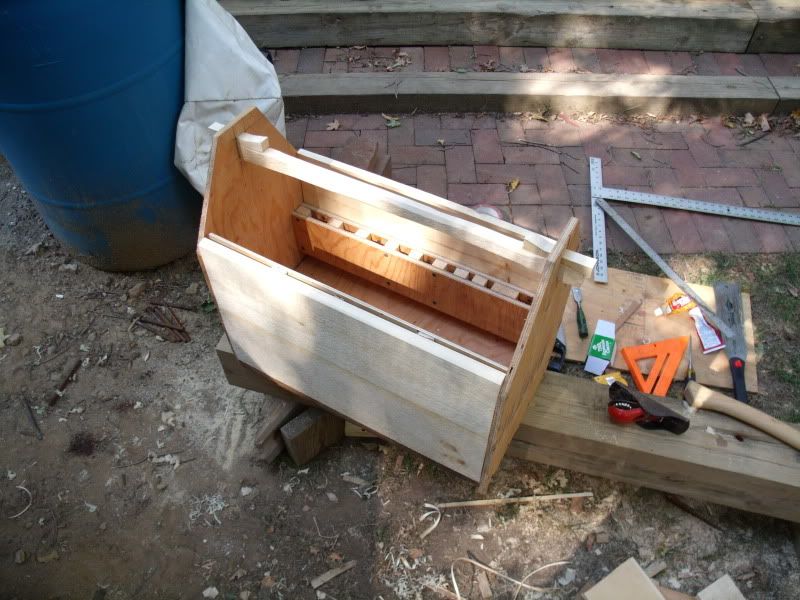
Up until an hour ago, this is what the shelf against the back wall of my shop looked like, but the box of small scraps was on the bottom shelf.  That poor little cardboard box has been overflowing with little nearly-useless bits of nice wood for quite a while now, and spilling out onto the floor.  Yesterday I finally did something about it and made a drawer for that bottom shelf that would hold plenty of scraps (as well as the small scrap metal box on the shelf in the left corner).  I elected to use some of the wide Yellow Pine boards I got the other day, so I cut the pieces to length, shot the ends, laid out some half blind dovetails on the front and regular dovetails on the back, and went to work with the saw and chisel.  Because this is a piece of shop furniture and I don't really care about appearances, I went fast and the joints show it.  I would have just nailed the thing together, but I needed the practice on half blind dovetails (I've only cut one on some scrap before).  I did nail the bottom in with some cut nails, because I don't have a plow plane (which will need to change in the near future).


The completed drawer in it's new home, being very useful:
 In the above photo you can also see a few things that could be interesting, depending on your interests.  On top of the shelf I have two boxes, the bottom of which holds several axes.  The top box holds my Narex mortise chisels, my Lee Valley scrub plane, my Lee Valley carcass saw, and I have my two favorite axes resting on top.  There is also a plate of glass that I set there to get at something else.  The top shelf holds all of my glues and finishes, which doesn't really amount to much, but there it is.  The middle shelf (from left to right) holds my stapler, the dremel, a box of various drill and driver bits, a box of timberlock screws, some half-finished spoons, and a tackle box holding all of my screws and nails.  To the right of the shelf I have all of my hardwood, mostly Maple that I milled myself, but also a little Cherry and a couple pieces of some mystery wood that could be Mahogany.  Just out of the picture on the right is my hot water heater.

A friend of mine approached me about building a storage solution for her DVD collection, which is currently about 320 strong.  I have been drawing up ideas based on 400, to allow for some growth.  We met up last night to see which of the ideas she likes most, and we settled on a fairly basic frame and panel design.  This unit will end up being about 68" tall and about 36" wide, so it will be no small thing.  Right now we're leaning toward Cherry for the carcass and a high quality plywood for the panels, with glass in the doors.  The curved sides are due to the distortion in my camera lens, all the lines are supposed to be straight.  I'm thinking I'll aim for the main carcass pieces to be 3" wide on the face, with the door frame about 2" wide.  On the scale drawing it looks about right to my eye.  I think I'll want to use knife hinges to keep the clean lines on the front, but I'm not sure what to do about pulls for the doors yet.  Maybe a couple of those things that allow you to press the door in, and then it springs out.   I'm definitely going to need a plow plane for this project.

Monday, January 17, 2011

Shooting Board and My First Dovetail Project

The shooting board was made by gluing up another panel as in the previous post about the subject, gluing and finish nailing them together, and nailing the fence on. I also applied some Ultra High Molecular Weight (slippery) tape to the part the plane rides on. It's very handy to have, it makes squaring up and fine tuning the length of boards much easier.


For my first dovetail project (I've cut a dozen dovetails before on scraps) I decided to go for a simple box that I can use to transport tools or the like. I started by cutting the stock to length, shooting the ends, and removing the tongues on the long edges (these boards came to me ship-lapped). To remove the tongues I split/cut them off with a knife, then planed the edges square.

After that, I marked off the baselines with my knife marking gauge. Next step was to lay out the tails, not that it did me much good. I think I hit the line twice on the whole box. They still work fine, but they don't look as nice.


Saw, coping saw, then chisel to the baseline.

You can see the advantage to using a marking gauge with a knife on this soft pine in these pins. The baselines look fine once the joint is assembled, but if you look at the endgrain, you can see that it's all torn up.

I started losing my patience trying to get the edges of the bottom boards to match up so I could glue them into a panel and set the bottom inside the frame. I ended up just nailing the boards to the bottom with some cut nails that I saved when I helped pull out an old hardwood floor over a year ago.


When I was cutting the pins on the first end board, I cut to the wrong side of the line so they are very sloppy. I corrected the issue on the other end, but they still aren't spectacular. The nailed-on bottom and a couple of judiciously placed finish nails have the whole thing more-or-less ship shape. It's good enough to lug some hammers around in anyways.

Thursday, September 23, 2010

Auger Bit Storage Roll

I decided to forgo putting a divider in the drawer of my toolbox for my auger bits in favor of creating this leather roll to store them. I used some of my 2-3 oz (?) leather that I ordered last year by accident. It varies in thickness, but on average is like a heavy canvas. It's difficult to stitch by hand, so I thought I would stop at the point you see in the photo before my finger tips started bleeding.

I still have nearly all of the dividers to stitch, and then I have to repeat the whole thing over on the opposite long edge. This will allow me to store my bits alternately, which is best for preserving their cutting edges. This project really makes me wish I had a leather sewing machine. I might use my sewing awl on the next side. This project doesn't really require lockstitch, but it wouldn't hurt.


Wednesday, September 22, 2010

Toolbox

I've been carrying my tools either in a small duffel or in my bike pannier buckets made from cat litter buckets. Not very organized or convenient. I collected some scraps from the site I've been working on, some 1x8 ship lap pine, and some old 1x12 pine. I also have some scrap plywood in a couple of different thicknesses. I drew up a plan for a toolbox after thinking on it for a few days, and my finished product ended up being fairly similar to what I was conceptualizing.

The bottom is a single 1x12, the ends are plywood, and the sides are the 1x8 pine with compartments attached. The false bottom is plywood, and removable. The drawer is plywood. When it arrives in the mail, I'll be using magnets to more firmly fix the drawer shut, and applying some low-friction tape for all the contact surfaces.

No power tools again. I can't find the charger for my cordless drill, and I didn't feel like getting out the circular saw. All of the cuts are actually much straighter than I can cut with a circular saw, and I'm pretty good with one. The box was built with a large number of the tools that you can see in it.


Ready to go to work!


Not a light toolbox, especially when loaded.