Showing posts with label Sharpening. Show all posts

Wednesday, May 09, 2012

Some Small Projects


A friend of mine recently moved into her own place, and has been furnishing it with free and cheap furniture.  This particular piece was originally picked up at the dump for firewood.  After taking a look at the solid Maple top and halfway decent construction underneath, I suggested instead refinishing.  For about an hour of work and $2 of paint (a pint of mis-tint from Ace Hardware), the table looks much better.  Good enough to go into the living room, in fact.  I simply planed the top down a little, taking off the old finish and most of the grime.  As you can see, I didn't want to go deep enough to totally remove that ugly stain, but it's significantly minimized at least.  Then I ragged on a few coats of Formby's tung oil finish and painted the base.  Not perfect, but good enough for now.


This past weekend I took some time off work and headed up to Holyoke, MA to run in the 7 Sisters Trail Race, a 12 mile (3700 feet elevation gain) trail race on some rocky, rooty, and generally tough trails.  Three days later, my legs still feel as though they've been beat with hammers.  I'm looking forward to getting ready for the mile and 5k races coming later this summer.


As I'm spending more time bouncing around between a few locations on a weekly or daily basis (and the weather is warming up so when I get the time to work wood, I want to be doing it outside), I'm trying to get my whole woodworking kit smaller and more portable.  For a while I was trying to work out a portable work bench solution (the Close Grain blog has a great write-up on this), but I've since abandoned that idea and have been studying Japanese methods.  Below you can see my solution at the moment.  This is a planing beam made from a solid Red Oak plank that used to be a mantle in a house I worked on last summer.  They didn't notice it missing, but I took their reading glasses too.

I planed the top flat and removed a little twist from it.  I'm thinking about adding cleats or feet for use on the floor, and alternatively I set it on a pair of horses to bring it to standing height.  The two incomplete holes in the right are for sliding planing stops.  It's about 4 feet long and maybe 10 inches wide.  You can see some stains on the left from where I used the far end as a sharpening station.

I have been reading up on and have been wanting to try a Japanese plane for a while, so I finally ordered the cheapest one from Japan Woodworker in California.  It arrived a few days ago, and I put it to use.  I was pleasantly surprised to find the body pretty much ready to use right away, with the area behind the blade relieved, the sole in wind, and a slight hollow scraped in the appropriate place.  Unfortunately, while flattening the blade I apparently removed too much metal so that now the blade sticks out too far when inserted.  For now I'm simply using the chipbreaker as a wedge to hold the blade in place much like a western wood bodied plane.  Eventually I may glue some paper shims into the blade bed to fix the issue.  I need to sharpen the blade some more, but so far it cuts very well, and I am enjoying using it.

As time permits, I plan on writing more about a portable woodworking setup in the future.  My goal is to fit as much functionality and versatility as possible into the smallest, most portable setup.

Wednesday, January 25, 2012

Breaking In a New Knife

Mora #106 Review

I decided that I should give one of these Mora carving knives a shot, usually what I use is a wider, slightly longer knife like the Mora #2 I have, or the #510, or a Woodjewel.  Still all narrow compared to many of the poplar bushcraft and outdoors knives, but quite wide feeling after using this new #106.

I ordered this one from bensbackwoods.com, he has a really wide selection of a lot of bushcraft gear, good prices, and quite unparalleled shipping prices, especially for how quickly he gets things out the door.  I buy from him whenever I get the chance.

These Mora knives are great deals, most being between $10-20.  The steel is quite good, the handles comfortable, and because of the low cost I'm not afraid to use them quite hard, which means they get more use than the expensive knives I used to own.  The biggest issue is that the sheaths they come with are not amazing.  The sheaths with the wood handled knives don't retain the knife very well if you do much moving around.  The plastic handles all click in fairly securely to their sheaths, but can still be a tad bulky and a tad ugly.  The Mora #1 would probably be my favorite knife except the handle is too small for the meat paws that pass for my hands.

The other drag about Mora knives is that they require a bit of a break-in.  The very edge is apparently not kept cool enough during finishing of the blades (leading to the steel at the edge being annealed), so until this is sharpened through the edge is fairly fragile and prone to rolling.  Normally on Mora knives when I first get them I grind the angle a bit thinner, and very slightly convex the edge on my 1x30 belt sander, in the process being sure to take off enough metal to get to the good, hard stuff beneath the initial soft layer.  I hesitated to use that process on this knife because of the narrowness of the blade and the illusion of delicacy it presents.  I instead chose to repeatedly cut into some various hard woods like seasoned Maple, Birch knots, and across the growth rings of a few different species of Pine, using both push cuts and draw or slicing cuts.  After making feather sticks and some various other cuts, the edge is rolled and visibly dull in several spots, so I lay it on the stone real quick and sharpen them out, and go back to cutting.  I did this a half dozen times or maybe a couple more, and it's still rolling.  I guess I'm not taking off that much metal when I really think about it, so this one may end up on the grinder yet.

In the meantime, I've been pleased with being able to cut tighter curves using more of the blade, because previously for tight cuts I would have to choke up and use only the very tip of my other knives.  The larger barrel handle is pretty comfortable so far, it's about the same as the handle on the #2.  Overall I'm quite pleased with this knife, I imagine I'll be using it quite a bit in the future.   

Sunday, August 07, 2011

Some New Tools


After I got back from NH, I decided that I needed a couple of things.  I ordered up a plane sack for my Veritas plow plane, because it's a bit awkward to store safely.  I'm thinking about getting sacks for my other planes as well now that I've seen that these are pretty nicely made.  I could also just buy gun sacks, made from the same stuff (3 for $15), and cut and stitch them to the appropriate lengths.  Because I left my framing square up north, I also decided to try out one of the Japanese squares that Lee Valley sells, in addition to a nice precise 12" rule (made by Shinwa, not pictured).  While I was on the site, I saw that Lee Valley was running a special on Narex bevel edge chisels, with even lands.  I could use a decent set of chisels, all of mine are crummy butt chisels I've collected.  I decided to pull the trigger, since I have the Narex mortise chisels and have been pleased with them.  I went for the set of four, because I don't need any more (and these four are probably more than enough).

You can see here after a couple of flattening strokes on each what kind of shape they were in.  Apart from the 3/4", all of these flattened up relatively easily.  The 3/4" will flatten out gradually as I sharpen it in the future, but for the time being I used something resembling "the ruler trick" to just flatten a narrow strip right behind the cutting edge.  I sharpened up to 600 grit DMT, stropped and packed them away in my new canvas roll.  Interestingly, the 1/2" felt the best in my hand as far as balance...hard to put into words, but it just feels incredibly elegant and nimble.  The lands aren't quite as narrow as I was hoping (and as appeared in the renderings on the site), but they will do.  I also wouldn't mind seeing a steeper angle on the bevels, as it is they wouldn't go too far for clearing the insides of dovetails, which is the only joint that I commonly cut where a bevel edge is a boon.  But maybe I'm asking too much of a set of chisels that I paid less than $10 a piece for.

A few words on the square: I bought this thinking it would make a nice lightweight framing square.  As soon as I went to use it to lay out some datum on a stick, however, I discovered that it's no good for the way I work.  In NH where I learned to lay out datum (the ideal reference planes projected through the timber), we worked from the inside of the square, using the scale on the inside of the tongue for marking the top and side measurements.  The Japanese square is only graduated on the outside edges, making it difficult to use in this fashion.  It will still be a handy small square, but will probably see a lot less use than my regular framing square because the framing square will be around for other tasks anyways.

I handled a couple of the Shinwa 12" rules in NH, and so when I decided I needed to replace my Staedtler rule (nothing inherently wrong with it, but it's not ideal for carpentry) I thought first of the Shinwa.  I decided to go ahead and order the Lee Valley cabinet maker's rule, and when it arrived I was surprised to see that it was in fact the Shinwa.  Very nice rule.  Precision graduations to 64ths on one scale, just in case, and overall a nice precision stainless steel rule.  I forgot that I had ordered it at all, until I was pulling my receipt out from under the packing paper in the box and discovered it, hence the exclusion from photos.  I even got to put it to some use setting the fence on the table saw at work, much more accurate than the tape measure. 

Monday, August 01, 2011

Finishing Up


Sorry for the gap in posting.  We started to get down to the wire, working upwards of 12 hours each day, and I didn't have the energy or the particular inclination to get on to post.  So I'm going to put up the last few days in one post.

We assembled one truss, got it upright and stabilized, then assembled and righted the other truss.  The trick to these was making sure they went up on rollers on the timber track that some of the crew constructed earlier in the week.  Once they were both up, we could install the tie beams with the knee braces, install the floor joists and decking, and finally install the rafters.  We got the roof sheathed in 1x, and got some good bracing in place for the locals that will roof the bridge.  All of this done, the riggers Grigg 2 and Grigg 3 prepared to roll the bridge over the falseworks and drop it in place.  Stable on the rollers and rigged up to a Tirfor, a large winch-like device, it slowly crawled into place.  It was jacked up, the falseworks removed (the timbers from which became a raft and a log rolling game for me and a few others), and it was settled into place on some Black Locust blocks.

My sharpening setup that I kept in my toolbox.  A 6x2" 220/600 grit DMT, and a two sided strop with black and green compound.  With a little spit or a dribble from my water bottle, this system allowed me to quickly and easily keep the edges on my tools sharp without having to walk back to the sharpening station at the other end of the site.


Cancelling the wind in a stick of timber using framing squares as winding sticks.


Will Truax, professional bridgewright, trimming a joint with a Gransfors forest axe.

This young man jumped right into planing, using my Stanley #8 with no problems.  He both pushed and pulled it, not seeming to have a preference.


Baron mean-mugging while trimming the roof sheathing.

My new friend Emma having fun with the camera.

Consulting with Bruce.

Grigg 2, the senior rigger.

Trimming decking made of 8/4 White Oak.

Joel McCarty, executive director of The Timber Framer's Guild, looking on.

Pulling the bridge into place.

Pirates trying to capsize my raft on Wason Pond.  Below, a spoon I carved in small increments in between the three primary activities: working, eating, and sleeping.  It's made from a hunk of White Birch I got from Dick Lewis, the sawyer that cut all the timber for the bridge.  I think it might be my favorite spoon that I've carved.

Monday, July 18, 2011

It's Been A While

It's been a while since my last post.  Once Spring kicked in, work picked up, so I've been working a fair amount.  I've been goofing around with spoons a bit, but nothing worth posting.  I've also gone on a couple of camping trips, spending time with my friends, running and biking quite a bit more than in Winter.

This week I'm going to be heading up to Chester, New Hampshire to participate in the covered bridge project that the Timber Frame Guild is putting together.  It will be a 9 day project, during which an entire covered bridge will go up.  I'm really excited.  I've started to put together my packing list, which includes all of my tools and maybe an extra shirt or two.  I had the thought that it might be handy to take my Underhill-Roubo bench, but I don't think it would be that useful.  It would also be very difficult to get into my little car.

In the next couple of days I will probably be spending some time sharpening, oiling, and tuning up all of my tools, or I might wait until I get up there since I'll be a day early.

For this project, I just bought myself a nice new RazorSaw 10 1/2" dozuki blade and a 220/600 grit 2x6" DMT plate.  Looks like I might have bought a blade that's not compatible with the handle I have, though, so I might have to whip something up.

That's all that's happening for now, I'll try to stay on top of this blog more.  I'll definitely be taking some pictures at the bridge project, so keep an eye out for those in the next couple of weeks.

Oh, and the bandsaw I got broke right after I bought a nice new 80" resaw blade, didn't even get to put it on.  If anyone wants to buy the blade (or the saw for parts, for that matter) drop me an email.  The carriage that the top wheel rides on snapped in half, old cast iron...  Most of the other parts are in good shape though.

Saturday, January 22, 2011

Sharpening and Practice Joints


My friend recently spent a couple months in Nepal doing some volunteer work, and brought back a nice painting for her dad. The painting is very long and narrow, though, so it's difficult to find a frame for it. It measures about 5x15". I suggested finding one of those frames that is designed to hold a few 4x6" prints one above the other, but we decided on something else. Her dad happens to be the carpenter that I work for from time to time, and during slow January he is remodeling his kitchen. He is using a lot of Cherry wood, and has some scraps left over. I'm going to make a nice (hopefully) custom frame for the picture. My friend came over for a couple of hours yesterday with the wood and some tools her dad wants me to sharpen. The plan was for me to start working right then, but we started discussing some different options for the corner joints. My friend isn't terribly savvy about woodworking, so when I started mentioning different joints we could use, she was a bit lost. I decided to demonstrate on some Fir scraps the two joints I was thinking most about. This ended up being some good practice and it was also good to have a physical representation of the joints right in front of us, instead of the abstract concepts or pictures off the internets.


After she left I broke out my sharpening gear to take care of the blade on my Jack plane, the one that I mentioned is looking like a toothing blade. Now it leaves a surface like glass. I ground the edge down on a piece of Norton 3x 220 grit paper spray glued to a piece of 1/4" thick glass. I got the glass for free from the local glass shop, it was a scrap and the guy was nice. Just out of curiosity (I sharpen freehand), I checked the angle using my sliding bevel and my speedsquare, and found that I was grinding the primary bevel at about 21 degrees. Then I ground a small bevel at the very edge on a piece of 1200 grit paper, I'm guessing at closer to 30. I also polished the back to 1200 grit. I took out almost all of the camber on the 220 grit paper, just leaving the corners a little turned up to help reduce tracks. The whole operation took about 10 minutes. If I wasn't taking the camber out (or if I had started on 100 grit), it would have taken half as long at most. After the 1200 grit sandpaper, I carefully stropped the wire edge away on a leather strop loaded with green chromium oxide compound (.5 micron average particle size). While I had the blade out I took the opportunity to polish a little pastewax onto the sole.

A tip (this is probably already out there or common knowledge, but just in case...); If you spray the adhesive onto the sandpaper instead of the glass, less of it sticks to the glass when you change paper, making it easier to scrape off. I follow the directions on the can for a "temporary hold" and it always works fine for me.

Also, a note. The front edge of my bench is straight, not bowed, and the glass is straight on all edges, also not bowed. The distortion is due to my camera lens.

Wednesday, September 22, 2010

Waterstone Box

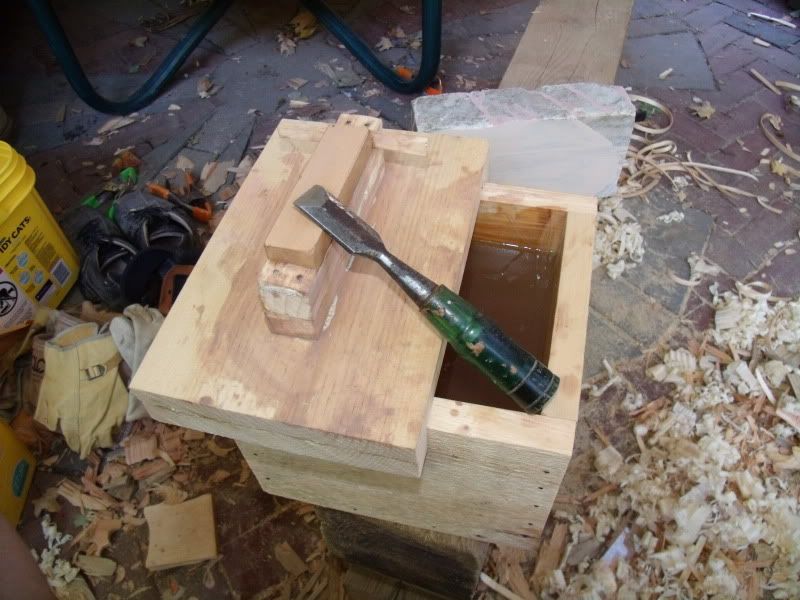
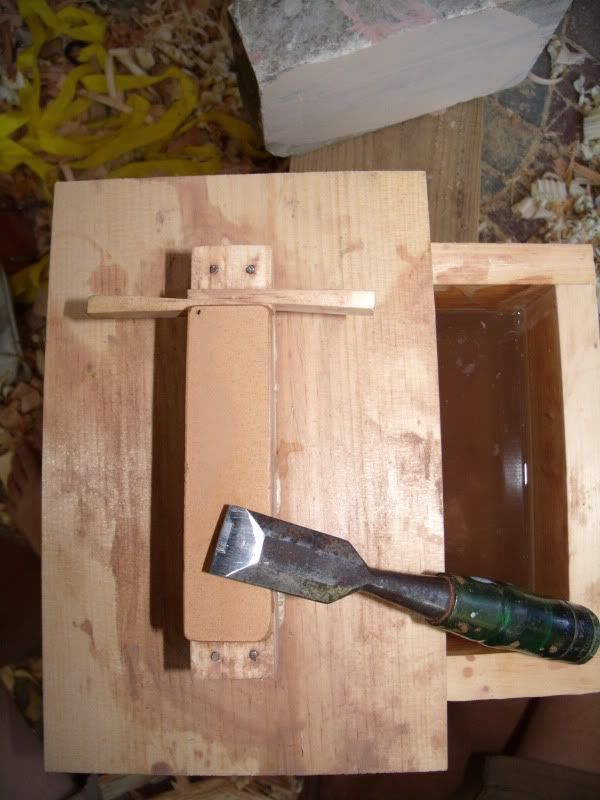
Inspired by the large sharpening trough at the 2010 Kesurokai gathering, I decided to build my own version for my two pocket water stones from LeeValley. I wanted a container to leave my stones in to soak, and also a way to hold the stones so that I could use two hands on the tool that I was sharpening.

I think I did an alright job on it, but I should have sized the box to hold my flattening stone for storage...

Made from 1x8 ship lap soft pine scraps, finish nails, silicon goo for the joints, and Gorilla Glue for structural gluing.


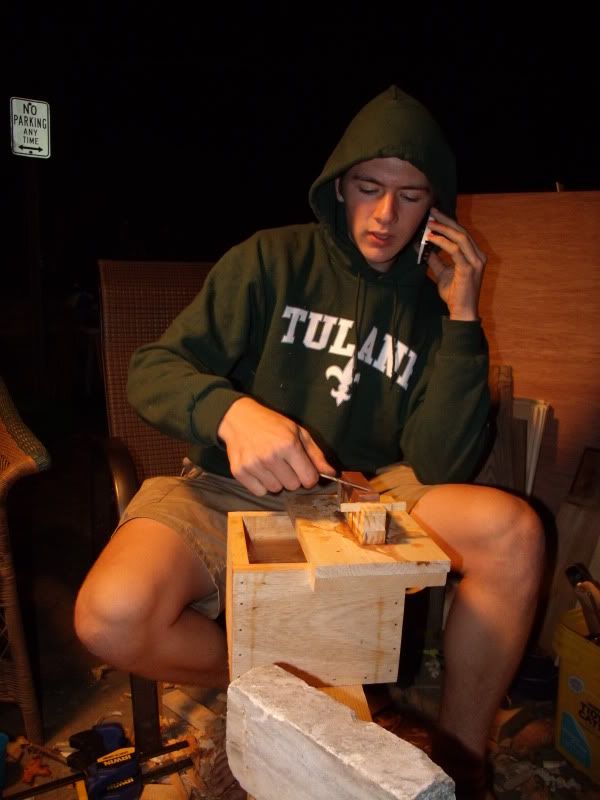
Testing it out while on the phone: